★ Competition – win a Konus Wild riflescope worth £90 – enter here! ★
PORTABLE AIR SOLUTION
This month the UBC lads evaluate the new Umarex ReadyAir compressor

JEF LOCKYER
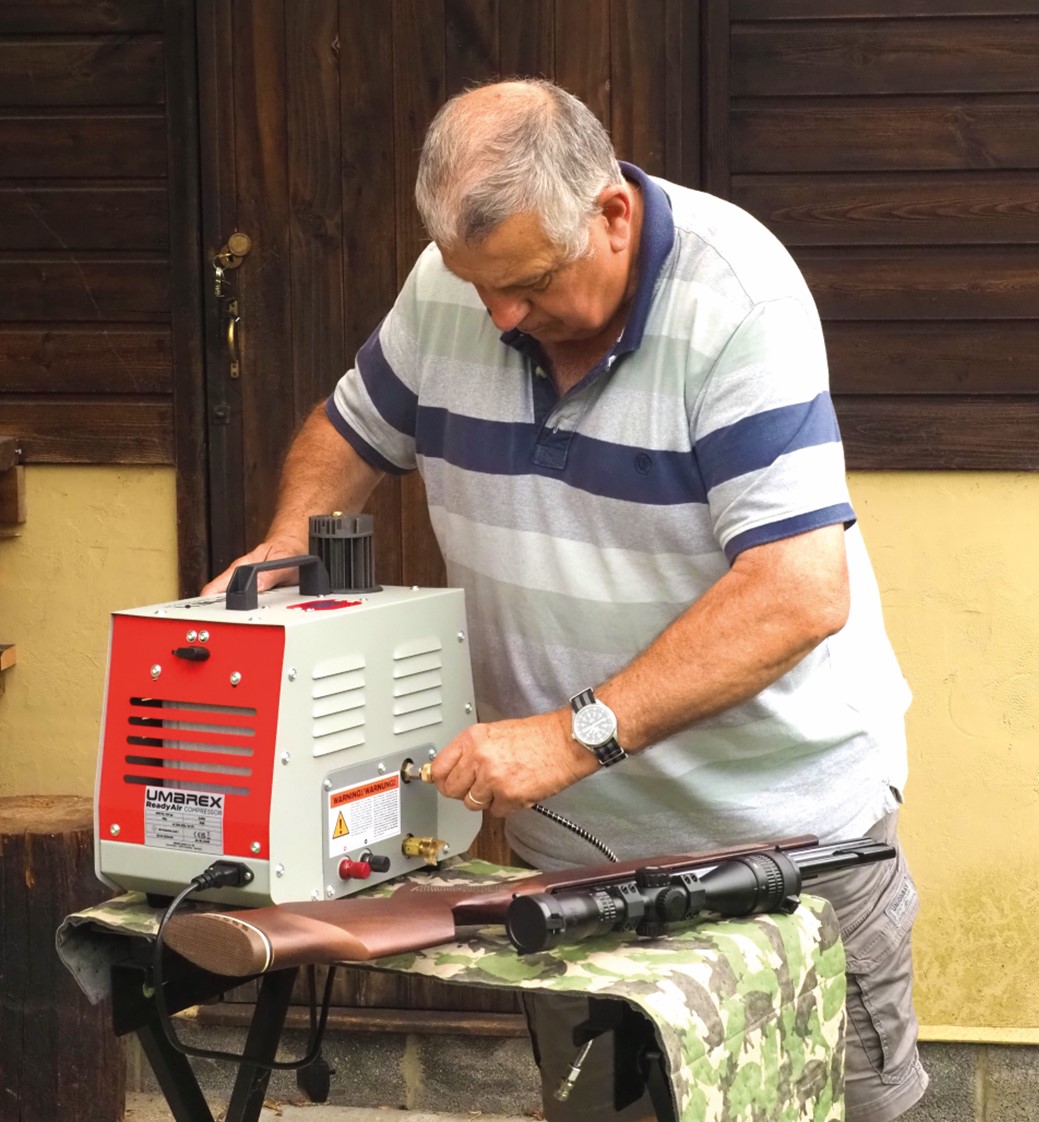
The eagerly awaited Umarex ReadyAir airgun charging compressor arrived! In the box was the compressor, a mains lead with a UK plug, and a pair of substantial leads for the 12-volt connection. There was also a flat box for the accessories; a mains lead with a two-pin plug, the instructions, a high-pressure hose, some quick release connectors, and a service kit. I decided to play it cautious and read the instructions first – we are dealing with up to 300 bar pressure here, after all.
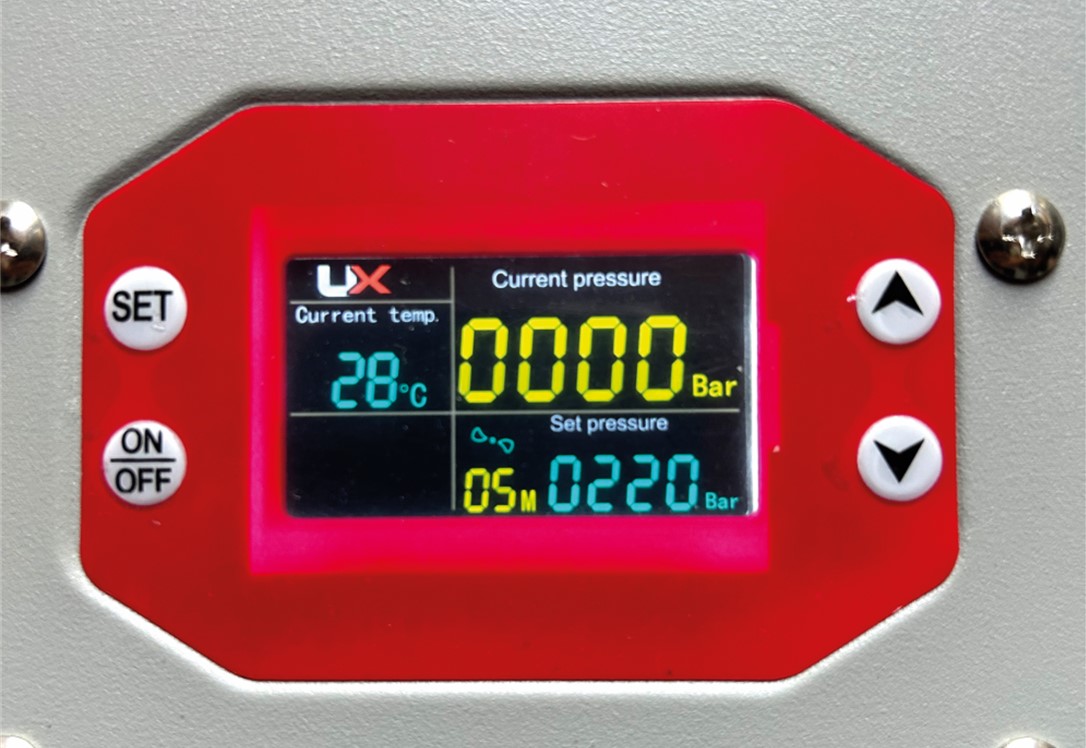
There wasn’t too much reading before a pictorial instruction sheet showed how to operate the compressor and make adjustments to the settings. I plugged the mains lead into a suitable 240v socket, and the compressor immediately sprang to life, the control panel illuminated and the cooling fan for the power supply unit started up – it’s fairly quiet. The display is in colour and shows current pressure, set pressure, temperature, and one that I didn’t notice at first, run time in minutes.
PICTORIAL STUDY
It took a few minutes study to work out the pictures in the manual, but once grasped, they are easy to follow and all settings are done with the up/down arrow buttons on the control panel, but beware, once in set mode you only have a couple of seconds to make your next key press, so be ready for what you want to do. It took me a couple of attempts to make my first setting change because of this. It comes set to ‘English’, but is in psi and degrees Fahrenheit for the pressure and temperature respectively. As all my guns are marked in ‘bar’ for pressure and we now generally use Celsius for temperature, I decided to change both.
Next, I changed the temperature cut-off setting to 55ºC. The maximum recommended temperature is 70ºC, but I wanted a decent margin of safety. From what I have read, I think not letting these small compressors get too hot is the key to longer life.
I had one minor gripe – if you have the compressor with the connection panel facing you, the control panel is upside down. Turning it round means the hose and pressure release valve are on the back, where they are difficult to reach, so the hose could do with being a little longer. I got used to reading it upside down.
QUICK CONNECTION
Once all the settings were sorted, I turned to the air supply. The hose simply screws onto the air outlet and only needs nipping up with a spanner. It doesn’t need to be much more than hand tight because it has a rubber seal inside. A female Foster 8mm Quick connector allows connection to your rifle. The supplied connectors are; two for Walther 200 bar and 300 bar air cylinders, and the third is a female 1/8 BSP thread for attaching to your filling device. I have probes for all my rifles with Foster Quick connectors built in, so I just had to snap one of these in. I also use a supplementary moisture filter which is simply attached by using an additional hose with suitable connectors. Worthy of note here is the pressure release valve or bleed screw. This is a chunky tri-lobed brass tap that is easy to grab hold of and makes doing it up airtight very easy.
Once connected, I did the first trial run on my weekender bottle, which was sitting at 280 bar and needed topping up to 300. I set the cut-off pressure at 300 and switched on. The starting temperature was at 27ºC and I also started a stop-watch to record the filling time. The compressor sounded quite smooth compared with others I have heard, and not too noisy, but at this stage the fans were not running. As the temperature climbed to 30ºC the fans kicked in, and now we were talking noisy! These fans shift quite a volume of air. Although it isn’t painful, it’s noisy enough to consider ear protection if you are going to fill a few rifles. Umarex claim 90dB, which equates to a lawn mower or a food mixer – bearable, but not good for prolonged exposure. However, a gun takes just a few minutes to top up, so it’s not going to be a problem for most users.
MOUNTING PRESSURE
The pressure climbed quickly as the hose and filter filled, and when the gauge read 280 bar, I opened the bottle valve, and as expected, the rate of increase slowed significantly. Pressure started to mount, though, and after five minutes the compressor cut out, and the fans continued to run to cool the unit down, which had reached 52ºC. There had been no drama. The unit had just got on with the job quickly and smoothly. I was impressed.
As the temperature dropped below 30ºC, I expected the fans to shut off, mainly because the manual implies that they do. They didn’t. I checked this on subsequent fills, and they don’t seem to cut out, but if you disconnect the supply and immediately switch back on, they reset and stay off. I only do this once the temperature is below 30ºC though.
Once filled, I closed the bottle valve and opened the bleed screw, the big brass tap making that job easy. Note that Umarex recommend a maximum fill capacity of 500cc, so filling a bottle is not recommended. I just topped mine up to see how well it coped with the 300-bar pressure, which it did admirably.
One good point; the compressor remembers the set pressure when switched off, so you don’t have to set it each time, but if you have guns with different fill pressures, you must remember to set it appropriately when switching on.
NON-CUMULATIVE
On day two I gave it a run on a real gun – my Walther Reign, which was sitting at 100 bar and needed a top up. The maximum fill pressure for this rifle is 232 bar, but I usually fill it to 220, a habit from the days of the old hand pump. Once connected and the pressure set, I switched on, closed the bleed screw and the pressure slowly started to rise, as did the temperature. This mini heatwave we are experiencing at the moment means it starts relatively high anyway, so it only needed to rise four degrees and the fans kicked in. Total time to cut-off was 4 mins 43 seconds by my stopwatch, and the run-time counter recorded four minutes on the compressor. This included filling the supplementary filter. The run time is not cumulative; the counter resets every time the start button is pressed, so this does mean you will need to keep a log of run times to know when the 20-hour maintenance period comes round.
Overall, I am very impressed with this compressor. Umarex set out to make filling airguns with a compressor as simple as possible and I think they have achieved it. Oil free and no maintenance for 20 hours couldn’t be much simpler. It’s almost ‘plug and play’ once you get your head around the setting procedure. I haven’t tried it on 12 volts, though, we’ll see if one of the others in the team will try it.
Technical Data
Power supply 220V 50Hz ac or 12V dc, 350Watts
Operating temperature range +5ºC to +35ºC
Maximum pressure 300 bar
Maximum recommended fill capacity 0.5l (500cc)
Maximum operating temperature 70ºC
Fan cut-in temperature 30ºC
Fuse rating 40 ampere
Noise level 90dB
Weight 10kg
Ade Cooper
As Jef mentioned, the ReadyAir is aimed at the novice user, and as this is my first experience with a compressor, that means me! Removal from the very substantial packaging revealed what appeared to be a solidly built unit. It’s fairly hefty at just over 12kg, but easily portable and after a quick look at the mostly pictorial manual, it was set up and ready to go.
The interface is very intuitive, and I found it easy to set the readings from psi to bar, and °F to °C. A really useful feature is being able to set the cut-off temperature to a custom setting, and I opted for 50°C.
After plugging in my rifle and hitting ‘start’, I was expecting a lot of noise, but to my surprise, there was just a gentle chugging, accompanied by a rather cool red light shining from the underside. After about a minute, the main fans kicked in, which increased the noise level to something similar to a hair dryer, but minutes later, my 310cc cylinder had gone from around 150 bar to the maximum 250 and the compressor stopped. The fans keep going until you turn the unit off, which I did when the temperature fell to 30°C. The maximum reached was 40°C, which is pretty cool considering the temperature in my garage was 25°C. The only other guns I had to hand which needed a top up were pistols, and these were filled in around a minute.
At the rate I use air, I’d imagine it will take quite some time before doing the service at 20 hours, but all the parts are included in the box, and a nice touch is the inclusion of the Walther and quick-fill adaptors. So far, the compressor experience has been very simple and fuss-free. I just need to find a way to get some exercise now because my pump is collecting dust in the cupboard!
Jason Curtis (who tried the 12-volt option)
I’ve used the Hills compressor at shooting shows and that worked well, so I had a good benchmark for the ReadyAir and I found that it would give it a good run for its money, probably taking the edge because it is maintenance free, needing no oil or water changing, just a simple service after 20 hours of use.
Like my friends, I read the instructions, then popped onto YouTube to watch a Umarex video on the product. Armed with all the info I needed, I unboxed the well-packaged ReadyAir, plugged everything in, adjusted the settings and went to grab a rifle. Typically, they were all topped up so I decided on my 3ltr dive bottle. After a quick test, I could see that it was holding 230 bar, so I grabbed my male-to-male, one-way, Foster fitting adaptor, which allowed me to open the bottle whilst connected to the compressor, but stops the air going in. This allows the compressor to build up air, equalising the pressure and thus filling the bottle.
All connected, I set the temperature cut-off to 60ºC and started the compressor. After 10 minutes, it had reached approx. 270 bar and hit 60ºC, so I let the unit cool down to 25ºC, started it again, and after another 10 minutes, it reached 300 bar and was at 59ºC. The unit didn’t seem to struggle, and although not really designed for filling a dive bottle, it managed very well. This isn’t something I would do too often and I’d suggest not trying to fill the likes of 7 or 12 litre bottles.
12-VOLT SUCCESS
A week or so later, I wanted to test the 12-volt cables, so popped out to the car, started the engine, connected everything up and the fan started whirring. I plugged the hose into the rifle, pressed the start button and it burst into life. My Walther Reign was down to just over 100 bar – I wanted to take it up to 200, my sweet spot – and the ReadyAir worked faultlessly, doing the job in three minutes according to the onboard counter. If you are using this outside, try to place it somewhere clean, or on a piece of cardboard, just so it doesn’t suck up loads of dust into the fans.
WORTH ITS WEIGHT
The UBC were invited to Emmett & Stone in Buckinghamshire on 1st July, to demo a range of pistols and rifles for the public to try, so I also took along the ReadyAir. It received quite a bit of attention because these are not bits of kit you get to see much, and folk were impressed with the speeds at which it could top up, and the light weight of the unit. All in all, I am very impressed with this little unit, and over time it would pay for itself because I wouldn’t have to do a 30-mile round trip to get my bottle filled!
Thank you, Ade and Jason. Luke DeAlberdi also took the compressor to a range day where it performed well all day, topping up users’ rifles. It was noted to be a bit slower than from a bottle, but otherwise it was well received.
Whilst the others were checking out the compressor, I took a look at maintenance. The link provided in the supplementary instruction sheet takes you to the Umarex web page for the product and there is a box to click for the video, which runs for about 27 minutes. Demonstrated by product manager, Marc Götzmann, the video takes you through the entire 20-hour maintenance procedure and is clear and easy to follow, so it should present no difficulties to anyone with basic DIY skills. The only tools required are a screwdriver, a Tx 20 wrench and a couple of Allen keys – and the first service is covered by the parts included with the compressor.

The ReadyAir was well received by the UBC team. The compressor is on a long-term review and it will be interesting to see how it performs over an extended period. We will let you know our findings.

Related Articles
HFT news
News
Life at the range - Gary Chillingworth
Gary Chillingworth reports from UKAHFT Nationals Round 7 at Anston, where Anne Higgins secured victory in the Ladies class with a superb 55
By Hollis Butler
HFT news
News
Life at the range - Gary Chillingworth
Shooting is a sport built on fun, friendship and competition, says Gary Chillingworth. Sometimes, that little plastic trophy feels priceless
By Gary Chillingworth
Get the latest news delivered direct to your door
Subscribe to Airgun World
Unlock the world of airgun shooting with a subscription to Airgun World magazine, Britain’s biggest-selling airgun publication.
Written by passionate, long-term airgun enthusiasts, each issue delivers expert insights, comprehensive gear reviews, and invaluable tips to enhance your shooting skills. Whether you’re a seasoned shot or new to the sport, Airgun World offers essential content covering shooting techniques, classic airguns, and the latest equipment innovations.
Save on shop price when you subscribe and pay just £4.07 per issue – 42% cheaper than buying in-store at £6.99!